UNBEATEN PATH TOURS & YOGA 707 888 6121
  • Home
  • Guided Experiences
    • ALL TOURS & GENERAL INFO
    • THE SEA RANCH ARCHITECTURE & NATURE
    • REDWOODS TO COAST
    • SIGILS WALKSHOP
    • HIKE, WRITE & DESIGN
    • Breath-Body-Mind
    • STORNETTA LANDS NAT'L MONUMENT
    • SEASCAPES AND WILDFLOWERS
    • ELOPEMENTS
    • BREATH WALK & FOREST BATHING
    • YOGA & CORPORATE RETREATS
    • LARGE GROUP OPTIONS
  • THE SEA RANCH
    • THE SEA RANCH
  • Resilience WALKshops
    • ABOUT OUR WALKSHOPS
    • SIGILS WALKSHOP
    • HIKE, WRITE & DESIGN
    • Breath-Body-Mind
  • RETREAT WORK
  • YOGA
    • ABOUT YOUR TEACHER & GENERAL INFO
    • PRIVATE YOGA SESSIONS
    • SOUND BATHING
    • YOGA STREAMS
    • YOGANATUR - HIKE & YOGA
  • BOOK ONLINE
  • CONTACT+
    • OUR BIO
    • WRITE A REVIEW
    • UNBEATEN PRESS
    • CONTACT US
    • FAQ
    • BLOG
  • Waiver & Policies
  • Buy our Beanie!

Food 4OREthought:)

Dear Food: 

Will you marry me?  I LOVE YOU!  This blog is dedicated just to you. I celebrate you by sharing my "made from scratch" recipes.
Nutrition Facts. org

I miss'ah my Harissa!  I think I will make some! 

6/25/2014

0 Comments

 
Picture
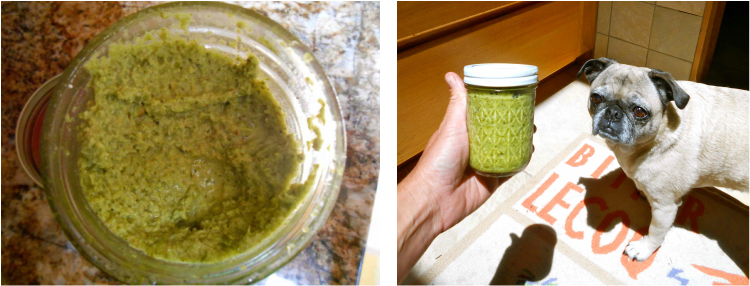
Found all over North Africa, this is one of my favorite Moroccan recipes.  Harissa is the master condiment.  It adds heat and flavor and is used like mustard. WARNING! my recipe is very spicy and the green Harissa, especially, can really pack a PUNCH! I like mine to have major, killer, stinging hotness.  Keeps you regular and happy:))))

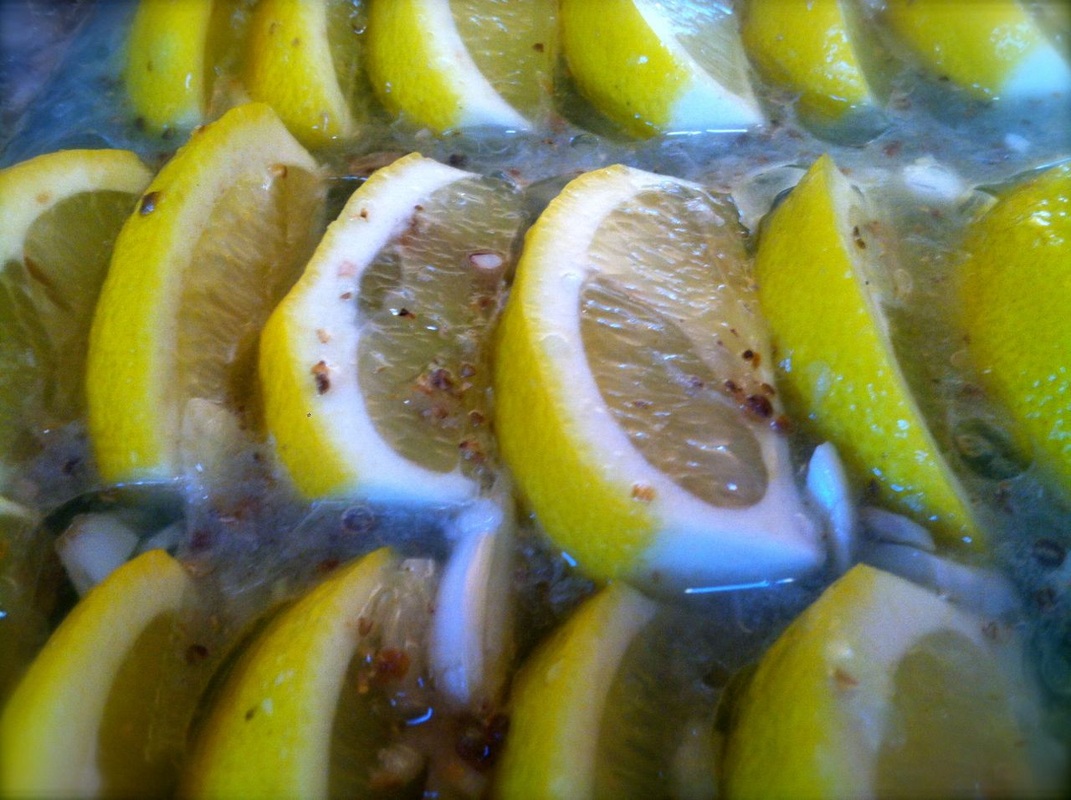
This recipe makes 16 oz. 

1 preserved lemon chopped (see recipe below)
8 oz small hot green chilis (combination of jalapeno, serrano and thai), stalks removed and roughly chopped
1 bunch coriander (cilantro), including stalks, chopped

1 tsp salt
5 cloves garlic
1/2 cup fresh mint leaves, chopped
1 Tbsp coriander seeds, toasted and crushed
1/2 cup olive oil (more if needed)

WEAR RUBBER GLOVES when handling hot peppers!  Never touch your face or eyes!

Add all ingredients except olive oil to food processor or blender.  While machine is running slowly add olive oil until consistency desired.  Let stand at room temperature for a minimum of 1 hour to infuse flavors.  Transfer to glass jar with a tight lid.  Can be stored indefinitely in the refridge... AWESOME with anything.  I especially love this mixed into cooked basmati rice with thinly cut arugula, goat cheese and a smattering of lemon vinaigrette. Totally delicious!


PRESERVED LEMON
(Recipe courtesy Williams-Sonoma: Entertaining – Inspired Menus for Cooking with Family and Friends)
  • 4 large thin-skinned lemons
  • 6 cloves garlic, thinly sliced
  • 1 teaspoon of sugar
  • 1 teaspoon coriander seeds, crushed
  • Coarse salt
  • 2/3 cup fresh lemon juice
  • 2 tablespoons extra-virgin olive oil
To make the preserved lemons, preheat the oven to 400F degrees. Cut a thin slice off both ends of each lemon. Cut each lemon into 8 wedges, and place the wedges in a non-reactive baking dish (glass or ceramic), just large enough to hold them in a single layer. Add the garlic, sugar, coriander seeds, three tablespoons of salt, lemon juice, and olive oil – toss to coat evenly. Cover the dish loosely with aluminum foil. Bake the lemon wedges for 10 minutes, turn off the oven and leave them in the oven overnight. In the morning, transfer the contents of the dish to an airtight container and refrigerate until ready to use; they will keep for up to two weeks.

0 Comments

Fathers Day Brunch: Vegan Hollandaise & Sunflower Pâté

6/13/2014

4 Comments

 
It is completely meaningless to put effort into activities that have no essence - Atisha
Sunday breakfast meals bring out the "made-from-scratch" in me and I think with Mother's Day just around the corner we should all make an effort to cook a nice meal for our mums, good friends or just for ourselves!  Vegans and Non Vegans alike will enjoy these great recipes I always use! Below I share two recipes: My vegan Hollandaise and a super tasty Polenta-like pâté made from ground sunflower seeds, cornmeal & potatoes.  And, of course, how can you make Eggs Benedict for your friends without HOMEMADE English Muffins. I made these foods from scratch from tried and true recipes that I love! BUT, of course, I alway give any recipe a bit of my own twist.  You should, too!  Have fun! and celebrate mothers past, present and future on May 11th - they make our wold a better place!
Picture
Vegan and Non-Vegan: On the left my Vegan Sunflower pâté topped with vegan Hollandaise along side Eggs Benedict.
Picture
Mmmmmmmm - Nooks and Crannies!  Home made English Muffins. I use Mark Bittman's recipe for sandwich bread in his book How to Cook Everything. This is a wonderful recipe. It is not vegan as it contains milk- but vegans can substitute with almond milk or other milk alternative.  The recipe is so easy and the ingredients so basic but the end result is so impressive  So, have at it and make these!
Another terrific appetizer, snack or protein main dish on Brunch Day is this wonderfully delicious Sunflower pâté. So flavorful and satisfying!  You will not believe it's vegan. Nutritional Yeast is what gives this pâté a rich, cheesy, nutty flavor. I LOVE this dish for picnics, lunches or parties.  See this and my Mock Arugula Hollandaise recipe below. 
Picture

Sunflower pâté  

This recipe is from one of my favorite vegan cookbooks that I picked up at the bottom of a pile in a thrift sale.  It's called Vegan Delights by Jeanne Marie Martin and was published in 1993.  Wonderful recipes in this book.  

Serves 6-8 people 

INGREDIENTS

  • 1 Cup Sunflowers seeds, finely ground
  • 1/2 cup corn meal
  • 1//2 cup yellow nutritional yeast  - click here for more information on nutritional yeast
  • 3 tsp. dried parsley flakes (I didn't have any but if you do, great!) 
  • 1.5 tsp dried basil
  • 1 tsp dried thyme, crushed
  • 3/4-1 tsp sea salt 
  • 1/2 tsp dried sage leaves (I didn't have sage on hand and it still tasted great!)
  • 1/4 tsp sea kelp powder

  • 1 Cup finely grated potato (I just used grater on food processor)
  • 1 and 1/3 cup water
  • 1/4 cup sunflower oil or other natural oil (you can reduce this amount if you wish)
  • 2 TBS soy sauce or Tamari

Optional: 3-4 tsp prepared horseradish.  I didn't have this on hand either so did not include this. Other things you could add include some finely chopped onions or minced garlic.  Keep the wet veggies to a minimum. 

DIRECTIONS: 
  • Mix the dry ingredients together in a large bowl.  Grate the potato and rinse it thoroughly to remove excess starch.  Squeeze and drain it after rinsing.  Add the remaining ingredients in the order given above, stirring in the potato last. Mix well. 
  • Preheat over to 375 degrees.  Generously oil a 9" glass pie plate and scoop in the pâté mixture. Put it in the oven and immediately turn the heat down to 350 degrees.  Bake 35-45 minutes until well browned. 
  • Let the pâté cool 1-2 hours and then chill it thoroughly before serving to set it completely.  It may be reheated later if desired.  It is tastiest when served at room temperature.  Keeps up to 7 days refrigerated or may be frozen in pie wedges (with reduced oil and no onions or garlic)

Vegan Arugula Hollandaise Sauce

Makes about 1 cup

INGREDIENTS

  • 3 TBS Earth Balance or Butter Alternative.  Or - use Ghee or Butter - whatever suits you!
  • 2 TBS Flour (I use gluten free flour)
  • 1/4  to 1/2 tsp Turmeric (this creates the hollandaise color)
  • 1 Cup Milk Alternative (Soy, Almond, etc) - I use homemade almond (none of the flavored stuff from the store:(
  • 2 TBS Nutritional Yeast 
  • Pinch cayenne
  • 1/2 or 1 TBS Veganaise (Vegan Mayo - I use Wildwood Vegan Aioli) 
  • Salt and Pepper to taste
  • Small handful of baby arugula. 


DIRECTIONS

  • Sizzle "butter" in heavy skillet on stove over med high heat
  • Add flour & turmeric to butter and mix thoroughly to create a paste - (do not burn paste)
  • Whisk in almond milk and keep whisking until smooth
  • Remove from heat and add the nutritional yeast and pinch of cayenne
  • At this point your "hollandaise" should be smooth, colorful and flavorful.  Next step is to the food processor 
  • In a small bowl of your food processor add your hollandaise, handful of arugula and 1/2 TBS or 1 TBS of Veganaise. Blend thoroughly and add water by the TableSpoons to reach the correct consistency you desire.  I thinned mine a bit with water.  It will thicken each time your reheat it - you can add water likewise each time you reheat. 
  • Add salt and pepper to taste.  Reheat when ready to serve.  Taste to your liking and add things you prefer!


4 Comments

Moroccan Preserved Lemons: Culinary Wizardry! 

6/12/2014

0 Comments

 
Moroccan is by far one of my favorite cuisines.  It's exquisite combination of spicy, savory and sweet brings home an ancient past life to me. Moroccan cuisine - especially that of Fez - encompasses a rich history and is a wonderful mixture of Arab, Andalusian, Berber and Jewish culinary influence.  Just incredible! 

One of the most common cooking ingredients in Moroccan cuisine is the preserved lemon.  Pickled in salt, preserved lemons lose their sharpness and acquire a distinct flavor and I use them in everything!  I use them as my lemon base in pesto, I grill them with vegetables (the skin is edible due to the brining) I mix them with olives, use them in salad dressings, mix them with potato salads and more!  They are a culinary form of wizardry!  People always ask why my dishes taste so good and it's usually because of the preserved lemons.   

There are three primary ways to brine lemons and some of these require several weeks of brining or preservation in salt and oil.  I have brined my own lemons for a long time and I must say that the below recipe from William Sonoma is a fantastic way to have preserved lemons in a day!  Can't beat it! ENJOY!
Picture
PRESERVED LEMON
(Recipe courtesy Williams-Sonoma: Entertaining – Inspired Menus for Cooking with Family and Friends)
  • 4 large thin-skinned lemons
  • 6 cloves garlic, thinly sliced
  • 1 teaspoon of sugar
  • 1 teaspoon coriander seeds, crushed
  • Coarse salt
  • 2/3 cup fresh lemon juice
  • 2 tablespoons extra-virgin olive oil
To make the preserved lemons, preheat the oven to 400F degrees. Cut a thin slice off both ends of each lemon. Cut each lemon into 8 wedges, and place the wedges in a non-reactive baking dish (glass or ceramic), just large enough to hold them in a single layer. Add the garlic, sugar, coriander seeds, three tablespoons of salt, lemon juice, and olive oil – toss to coat evenly. Cover the dish loosely with aluminum foil. Bake the lemon wedges for 10 minutes, turn off the oven and leave them in the oven overnight. In the morning, transfer the contents of the dish to an airtight container and refrigerate until ready to use; they will keep for up to two weeks.

They will be mushy and yummy and they keep well.  Use them in harissa, pesto, salad dressing, on skewers with chicken and olives as well as tons of other stuff!  JUST DO IT! 
Picture
Lemons placed in pan before adding all other ingredients
Picture
Mix all other ingredients with lemons then cover lightly in foil and bake at 400 degrees F for 10 minutes and then turn off stove and leave over night in the stove covered. MAKE A POST-IT NOTE so you remember to jar them in the morning!
0 Comments

Golden Beet "Potato" Salad with red beet, miso, ginger mayo! 

2/27/2014

1 Comment

 
Want a unique alternative to potato salad that draws a crowd? Here's a solution I have created that is unique, tasty and will be the talk of the town.  I love potatoes but wanted an alternative that would provide me with maximum nutritional benefit.  Roasted golden beets and carrots provide the same texture as potatoes.  Add in roasted onions and kale to the equation and you have the perfect balance.  The kale is critical and I roast this separately from the other veggies to preserve its crunchy texture.  As a final touch I created my own beet, miso, ginger mayo for extra nutritional punch and flavor - the fermented, salty flavor of miso is harmonious to the sweetness of the veggies!

The one hitch to this recipe: Since this a new recipe for me I noticed that when I stored the leftovers in the refrigerator for the night it lost its color and some of the texture softened.  Therefore, I suggest that when you make it you serve it rather immediately. As many of you may know about me - I make these recipes up as I go along and do my best to relay them to you - things may need tweeking on your behalf… Especially with my mayo recipe below.   Good luck and let me know how it goes. 
Picture
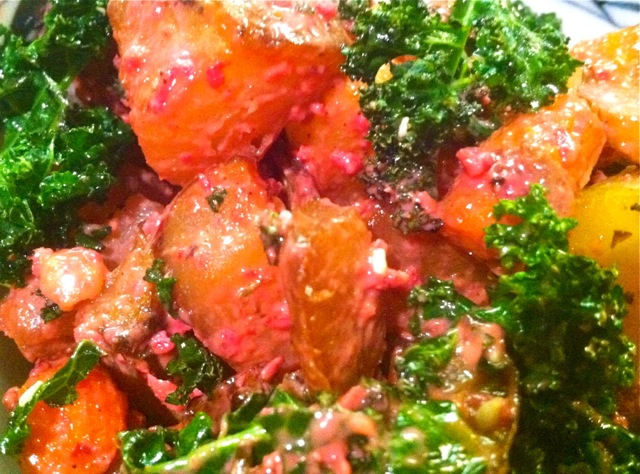
Ingredients for Roasting: 
Serves 6 
  • 2 Golden Beets - chopped 
  • 2 Large Carrots - chopped
  • 1/2 large onion - chopped
  • 1 bunch green kale 

Ingredients for Mayo
See separate directions below - NOTE these amounts are an approximation and may need adjustment - work with it and add or modify per your flavor preference - but these amounts are a good generalization (I just make this up on the spot when I first make it:)
  • 1/4 cup vegenaise or reg. mayo (I use Wildwood Aioli)
  • 1 large tsp good quality yellow miso paste (i add a bit more if it needs it later on)
  • 1.5 tsp grated fresh ginger (approx.)
  • 1 Tbs tahini
  • 1/3 of a medium sized red beet
  • 2 red radishes
  • a few grinds of pepper
  • a few Tbs of water to thin mixture if needed
Directions for roasting veggies
  • Preheat oven to 400 degrees
  • Combine beets, carrots and onion in a large bowl.  
  • Add a large pinch or two of kosher salt and a few grinds of black pepper. 
  • Drizzle with olive oil or a neutral oil and mix generously with your hands until all is fully coated
  • Place all on cookie sheet and roast initially for 20-30 minutes then turn the veggies and roast again for another 20 minutes or until they are all is nicely browned and you can easily put a fork into your beets.  Everyone's oven is different, so keep an eye on your veggies (I also cut my veggies in large pieces). 
  • Remove from oven and move onto a cold cookie sheet and allow to cool while you prepare your mayo and roast Kale - KEEP OVEN ON TO ROAST KALE

ROAST KALE SEPARATELY 
  • Tear kale from stems to create smaller pieces and place in large bowl
  • Drizzle with dark sesame oil and add a spoonful of sesame seeds, add salt and pepper to taste
  • Roast for 5 - 7 minutes then turn and roast another 4 or 5 minutes or until it browns slightly on the edges - this is up to you but I like to brown it slightly. 
  • Remove from oven and allow it to cool while you make the mayo - this will allow the kale to "crunch" up as it cools

Directions for the MAYO
  • Chop beets and radishes
  • In a food processor combine all ingredients and and run on high until smooth - be sure to check if it needs thinning and add water if needed (a little bit at a time) - don't make it too thin - you want the consistency of mayo. The radishes, beets and ginger will create a little texture - its okay if little bits of these are present in the mayo - that's what makes it good.  
  • Adjust flavors to taste… if you are having trouble refining the flavor - let it sit for a little bit and then come back to it - it is good to allow the veggies to cool anyhow
Combine all ingredients in a large bowl and serve immediately.   HAVE FUN WITH THIS
Optional add-ins
  • sesame seeds or nuts of your choice
  • cheese - a hard cheese with a kick
  • fried rice noodles
  • YOUR CHOICE IS YOUR CHOICE! ENJOY!


1 Comment

Kneadlessly Loafin' "Ah-round" 

1/23/2014

0 Comments

 
Picture
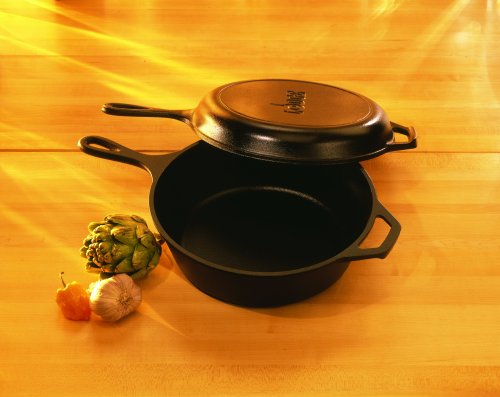
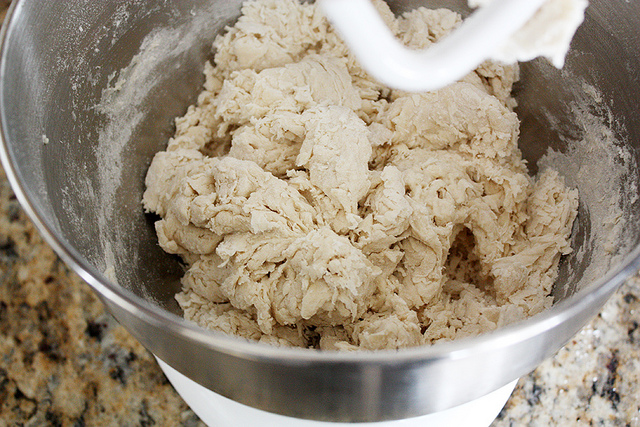
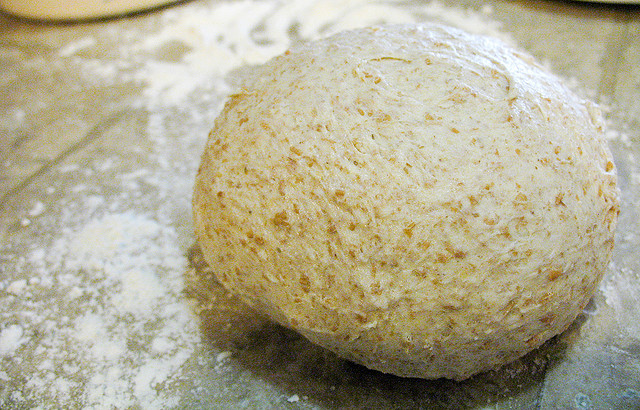
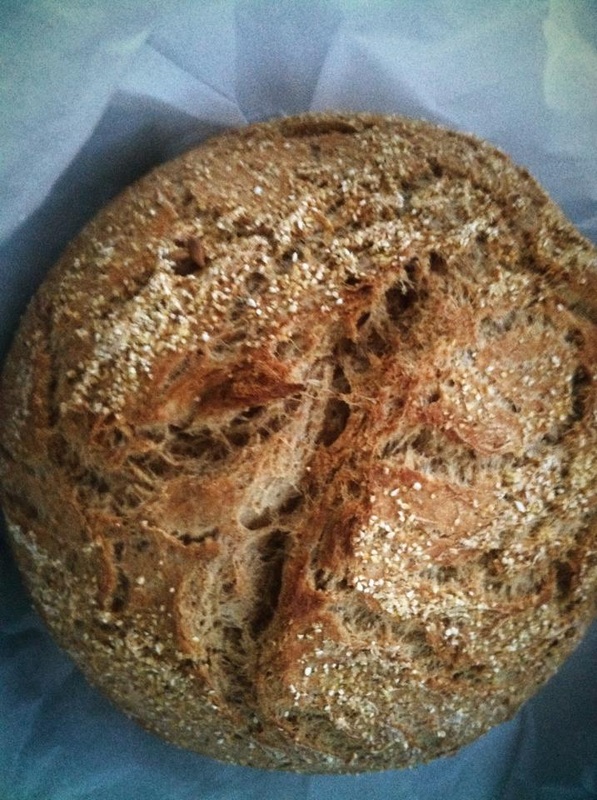
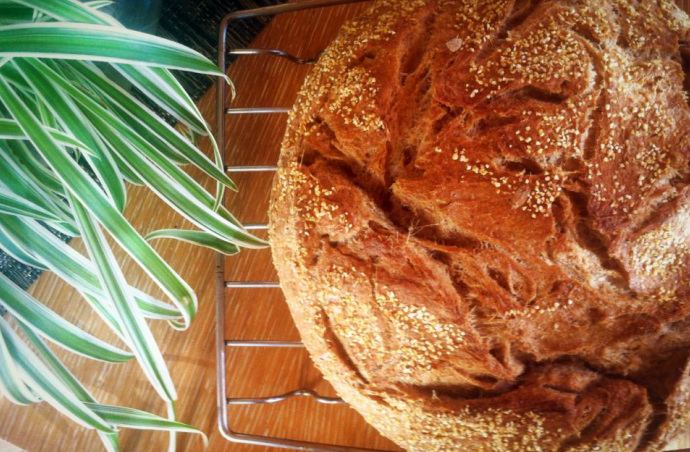
Madge Malone's loaf of wholesome goodness… cooling down for some slicin'
Think you're too much of a loaf to make a good loaf of wholesome bread?  Well, you CAN BE!  Why buy bread that has all sorts of preservatives and fillers when you can make your own right at home - and easily?  We're fortunate to have a wonderful bread company near us that offers us wholesome bread (2Fish Baking Co).  But, not everyone has this luxury.  When our bread shop is not open I know I can make a great loaf for my family without worry or hassle.  This recipe makes it easy by using quick rise yeast and allowing the dough to sit over night or during the day (while at work, for example).  There is only one quick moment (15 minutes prior to baking) where you are required to knead the dough.  BUT THE KEY to a great, crunchy-on-the-outside, loaf is baking it in a dutch oven.  I have a cast iron set by LODGE (Love their stuff) that creates a great hot space to bake my bread and create that down-home crunch and tenderness.

Here is a loaf I made just the other day:  A whole wheat loaf for a dinner at friends.  Read Below for a "Here's How"

What you need: 

A good Dutch Oven pot & lid - I use my cast iron Lodge set - or you can use pyrex that has a lid, etc.  See photo of sample at right 

Time to allow dough to rise on its own - up to 12-15 hours (I make my dough after dinner and set it aside covered in plastic or with a moist cloth overnight and into the morning - I prefer the moist cloth) 
Note: 
The dough should be in a fairly warm place - 65-70 F.  

Ingredients for a Whole Wheat Loaf

  • 2 Cups Each Unbleached White Flour & Whole Wheat Flour
  • 1 Tsp Kosher or Sea Salt
  • 1 Packet Instant Rise Yeast
  • 2 cups warm water (70 degrees F)

Options (1 tsp toasted fennel or caraway seeds & 1/2 tsp toasted cumin seeds - add these with your dry ingredients and mix)

Directions

  • Mix dry ingredients together in a large bowl  
  • Add warm water (be sure to test temperature so you don't kill the yeast)
  • Mix with fork or your hands until dough takes on a shaggy-ball like appearance
  • In a new/clean large metal bowl place a bit of oil on the bottom
  • Put shaggy dough into newly oiled bowl and rub a bit of oil on top of the dough ball
  • Cover with plastic wrap or a warm moist cloth 
  • Allow dough to rise for 12 hours or so 


When Dough is Ready: 

  • Preheat oven to 450 F
  • Place your dutch oven into stove (with lid on it) and allow it to heat in oven for 30 minutes
  • Meanwhile, remove dough from bowl and knead it mildly for a few minutes, shaking a bit of flour on counter top surface as often of needed to keep dough from sticking
  • Shape dough into ball, sprinkle corn meal on counter top (or kneading surface) and place your shaped dough on top of this
  • sprinkle top of dough with cornmeal & a thin shaking of flour and cover lightly with a cloth (not terry cloth)
  • Let dough rest for 15 minutes as your dutch oven preheats
  • When ready, remove dutch oven from stove - open the lid and place your dough ball BOTTOM SIDE UP into the dutch oven and cover with lid - BE CAREFUL - THIS IS VERY HOT!!!!
  • Bake dough covered for 30 minutes - rack position is in middle of oven
  • After 30 minutes is up then remove lid and allow to bake an additional 20 to 30 minutes until nicely browned
  • When done, remove from oven (carefully - its hot!!!) and then take loaf out of pan and place on rack to cool. 
  • Allow bread to cool completely before slicing!


Picture
Lodge cast iron cookware/dutch oven
Picture
I mix my dough by hand but borrowed this image for visual purposes… my shaggy dough looks like this…
Picture
shaped loaf
Picture
My yummy bread that I can share with friends… we had a wonderful fish stew with fresh caught Ling Cod at our friends' house. This loaf was the perfect gift for our hosts:)
0 Comments

Shabu Shabu Time:  Have a Dinner Party with friends!

1/16/2014

0 Comments

 
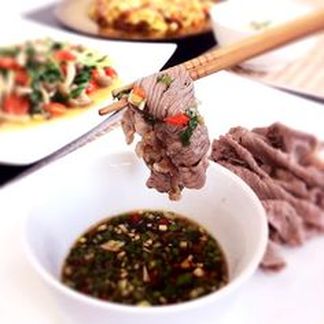
There's a great community monthly sale that occurs here every first Saturday of the month called Pay N Take!  I am all about recycling everything.  What one person wishes to be rid of, another needs.  I love shopping here - I find great gifts for people, great tools and things I need in the house - and I ALWAYS find great cookware items. Although we didn't see much of interest at first, I decided to take my usual "second peruse" and came upon a brand new (or barely used), high quality Japanese Hot Pot Steamboat for $5!  Perfect for Shabu Shabu - or, as I like to call it, JAPANESE FONDUE! 
Picture
WHAT IS SHABU SHABU - Shabu-shabu (しゃぶしゃぶ , also spelled shyabu-shyabu?) is a Japanese dish featuring thinly sliced beef boiled in water. The term is an onomatopœia, derived from the sound emitted when the ingredients are stirred in the cooking pot. The dish is related to sukiyaki in style: Both consist of thinly sliced meat and vegetables and served with dipping sauces. However, Shabu-shabu is considered to be more savory and less sweet than sukiyaki.

WHY I LIKE SHABU SHABU 
I love Shabu Shabu because it's easy, interactive and a great way to have dinner with friends or family!  I don't really have to cook - all I have to do is prep vegetables and whatever else I want to put into the broth.  And I the love dips that are the typical fare with Shabu Shabu! They are the key to having a great experience with Shabu Shabu.  When you remove the food from the hot pot you dip them these fabulously flavorful dips and then plunk them into your mouth!  They are not complicated dips but simple and tasty! 
Ingedients
 
For easy instructions please see this link for details and instructions… a great reference for Shabu Shabu. Below I have provided a listing of basic ingredients and directions only. 

The key is to use a variety of vegetables that you have in the fridge.  You place your broth into the hot pot and allow it to boil. The broth can be a simple miso-based broth with grated garlic and ginger with some sea greens or just plain water - it doesn't have to be hard or complicated!  
Once the broth boils, then add your ingredients bit by bit. Be flexible with yourself… use what you have on hand.  I also used tofu as my vegan option.   Dip your proteins into the hot pot last - and only for a few seconds (Tofu being the exception. I place it in the pot with the veggies and allow it to cook for a few minutes).  Remove your veggies & proteins and dip them into your dips for some great eating.  

FOR SHABU SHABU INGREDIENTS:
  • 3 inch dried 'kombu' seaweed (see link for directions for broth - this is removed before the broth is served and used for cooking ingredients)
  • 1/2 head of napa cabbage, washed and cut
  • 1/2 bunch ‘shungiku’ (Tong Hao, Garland Chrysanthemum), washed and cut
  • 1 pkg enoki mushrooms, stalks removed and pulled apart
  • 8 shiitake mushrooms, stem removed
  • 2 inch carrot, peeled and cut into thin round slices
  • 1 pkg shimeji mushrooms, stalks removed and pulled apart
  • 1 block medium/firm tofu, cut into 1.5 inch square
  • 1 Tokyo Negi, washed and cut diagonally into 2-inch pieces (can be substitute with leeks)
  • 1 ½ - 2 lb sirloin beef (or pork loin), sliced very thinly, or buy pre-sliced ‘shabu shabu’ meat
  • 1 pkg udon (I like Sanuki brand Udon)
  • Sesame Sauce* (homemade recipe)
  • Ponzu Sauce* (homemade recipe)
  • Grated Daikon
  • Shichimi Togarashi (Japanese seven flavor Chili pepper)
I have provided a great link for the dip recipes above - I used this wonderful website as a great reference when preparing for my own version of Shabu Shabu.  


Below is a pic of my actual hot pot that I purchased at the community sale.  AWESOME! 
Picture
Ingredients can be what you want them to be! 
Picture
Dip them into your boiling hot pot = FUN!
Remember: put vegetables in batches - mushrooms first and allow them to cook the longest.  Once the veggies are ready, then dip your Shabu Shabu beef into the boiling water and swish it around for a few seconds and remove (depends on how well you want your proteins cooked)
Picture
Dip them into your SNAZZY SAUCES!  
Remember:  the dips make the dish!  
Picture
0 Comments

"Meaty" Vegan Loaf... so satisfying and yummy!

12/26/2013

0 Comments

 
This is a great base recipe that creates a satisfying, filling and tasty meat alternative.  I LOVE IT with mash potatoes and some additional steamed veggies.  This recipe is from The Simple Veganista.  However, as always I put my own twist on things.  There are plenty of options for spices - you could use the standard spices for stuffing (sage, thyme, celery salt, etc) - just substitute them in - to create a holiday, savory loaf.  Or replace the thyme with ginger, garlic (hing - a garlic alternative), cumin, corriander and hot chiles to create a loaf with a wonderful Asian flare.  Garam masala (an Indian cuisine spice mix) is also a great flavor to add into this loaf.  Be creative - add spices, taste, adjust and then prepare the loaf for baking.   ENJOY!
Picture

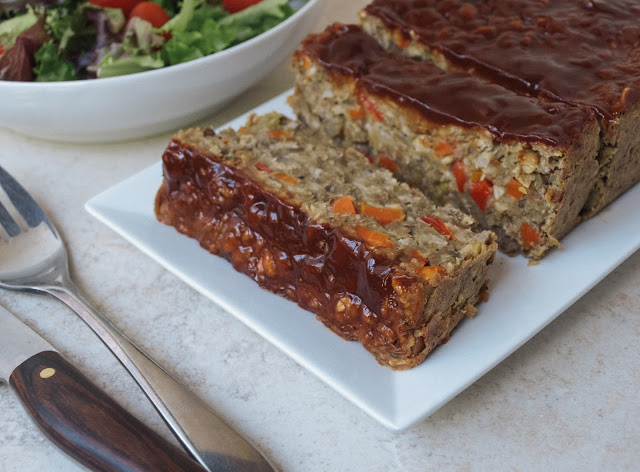
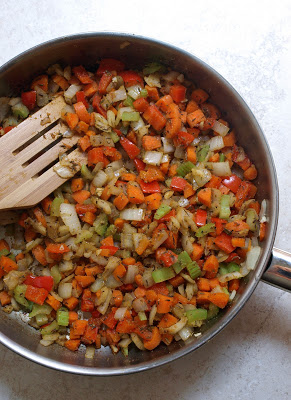
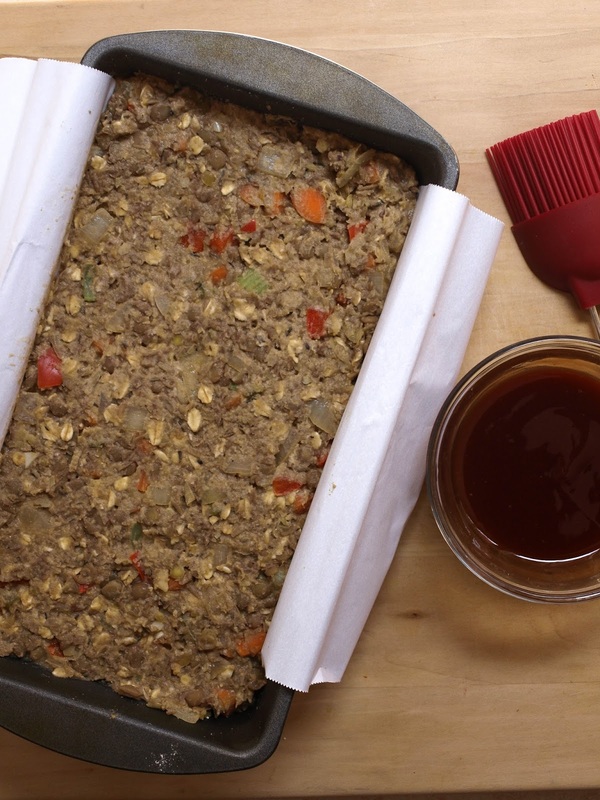
The Ultimate Vegetable Lentil Loaf

Ingredients

Loaf
1 cup dry lentils
2 1/2 cups water or vegetable broth
3 tablespoons flaxseed meal (ground flaxseeds)
1/3 cup water (6 tablespoons)
2 tablespoons extra virgin olive oil for sauteing, or steam saute using 1/4 cup water
3 garlic cloves, minced
1 small onion, finely diced
1 small bell pepper, finely diced
1 carrot, finely diced or grated
1 celery stalk, finely diced
3/4 cup oats (I used GF oats)
1/2 cup oat flour or finely ground oats
1 heaping teaspoon dried thyme
1/2 heaping teaspoon cumin
1/2 teaspoon each garlic powder & onion powder...for good measure!
1/4 - 1/2 teaspoon ground chipotle pepper, optional
cracked pepper & sea salt to taste

Glaze  (I totally modify this glaze - sometimes I will add orange marmalade and ginger - skip the ketchup and use rice vinegar, etc... be creative - you need a little bit of sweet to create a glaze)
3 tablespoons organic ketchup
1 tablespoon balsamic vinegar
1 tablespoon pure maple syrup


Rinse lentils. In large pot add 2 1/2 cups water with lentils. Bring to a boil, reduce heat, cover and simmer for about 35 minutes, stirring occasionally. It's ok if they get mushy, we are going to roughly puree 3/4 of the mixture when cooled. Once done, remove lid and set aside to cool. they will thicken upon standing, about 15 minutes is good.

Preheat oven to 350 degrees.

In small bowl combine flaxseed meal and 1/3 cup water, set aside for at least 10 minutes, preferably in the refrigerator. This will act as a binder and will thicken nicely upon sitting.

Prepare vegetables. In saute pan heat oil or water over medium heat. Saute garlic, onion, bell pepper, carrots and celery for about 5 minutes. Add spices mixing well to incorporate. Set aside to cool.

Using a submersion blender or food processor, blend 3/4 of the lentil mixture. For me this was an important part, I tried it other ways and this worked to help as a binder. If using a submersion blender, tilt your pot slightly to the side for easier blending.

Combine sauteed vegetables with the lentils, oats, oat flour and flax egg, mix well. Taste, adding pepper and salt as needed. Or any other herb or spice you might like. Place mixture into a loaf pan lined with parchment paper, leaving it overlapping for easy removal later. Press down firmly filling in along the edges too.

Prepare your glaze by combining all ingredients in a small bowl, mix until incorporated. I recommend making each tablespoon heaping so you have plenty of this great sauce on top. Spread over top of loaf and bake in oven for about 45 - 50 minutes. Let cool a bit before slicing.
Picture
Picture
0 Comments

Madge's Minty Mountains! A tasty, minty, crunchy Holiday cookie!

12/17/2013

0 Comments

 
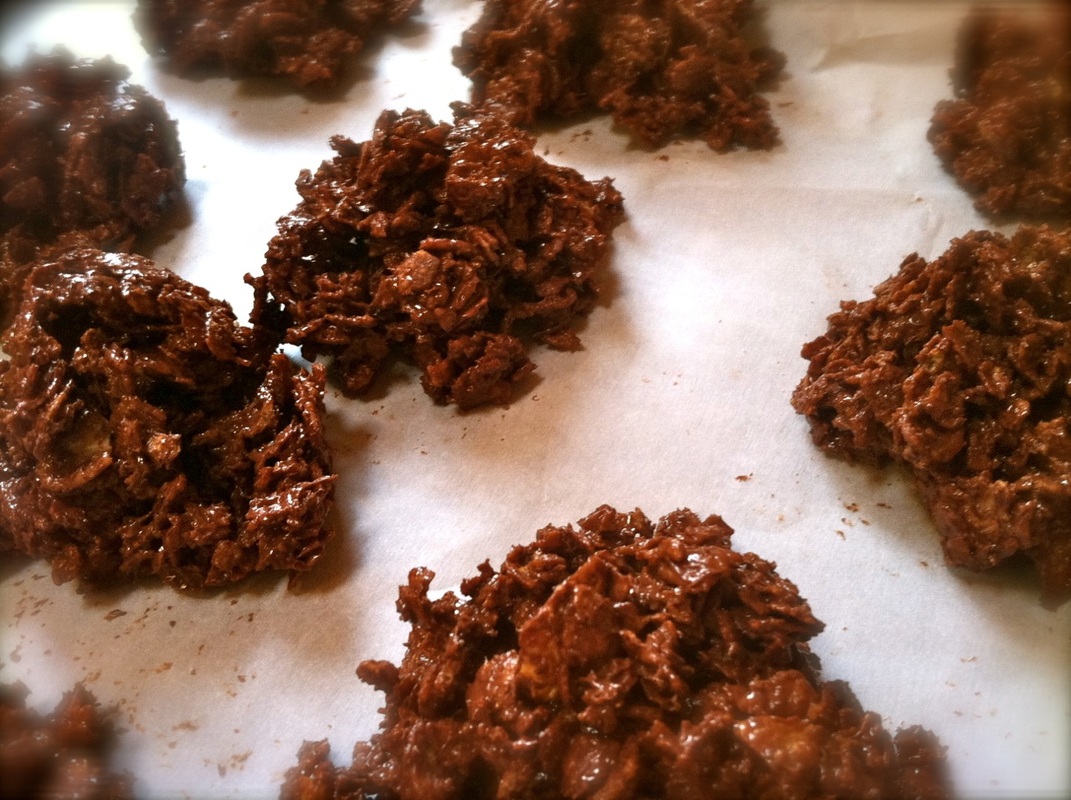
This is a GREAT holiday treat recipe that's sooooo easy to make, sooooo tasty and makes a TERRIFIC HOLIDAY GIFT! People always rave about them when I make them.  I call them (my) Madge's Minty Mountains and they require a mere 4FOUR! ingredients.  Corn Flakes, semi-sweet or dark chocolate chips, peppermint extract and powdered sugar.  I use gluten free millet or corn flakes from the health food store... they have a much better crunch and they are much better for you. They take less than 20 minutes to make!!  
See how below!
Picture
INGREDIENTS: 

  • Approximately 1/2 of a medium box of Corn Flakes - I buy gluten free millet flakes or gluten free corn flakes at the health food store.  They are much crunchier & tastier. Eye measurement: In a large 10" bowl it would be about 1/2 full of corn flakes.
  • 1 standard size bag of semi-sweet or dark chocolate chips
  • 1/2 tsp peppermint extract (one large cap full) 
  • 1 scoop of powdered sugar in a hand held strainer (like a tea pour strainer)  


DIRECTIONS:  

HINT: Chocolate is very fickle and doesn't like being over heated or combined with water.  Chocolate is an oil, really - and when you add your extract it is like adding water to oil.  Therefore, you must add the extract only when the chocolate is melted and warm and you must whisk your extract in as quickly as possible - or your chocolate will seize and will become rock hard and unfixable... just chuck it away if that happens:(( Bummer

  • VERY carefully and slowly heat your chips in a glass bowl over a simmering pot of water.  Stirring often.  Once melted remove your bowl and - with your measured extract at the ready - pour this quickly into the chocolate as your stir consistently with a fork or whisk.  Have someone hold the bowl for you or hold it yourself once you have poured the extract in.  This helps with balance when stirring it all together.  
  • Taste chocolate for minty-ness.  If you need to add more... warm your chocolate over the water again for just a short moment (so the choc gets soft) and then add your additional extract. 
  • In a large bowl pour in your corn flakes.  It may seem like too much but they will break down and your chocolate will cover them.  
  • Pour melted, minty chocolate over corn flakes and work quickly to combine.  This takes arm work and you MUST WORK QUICKLY.  It is hard to get the chocolate to cover the flakes thoroughly - it is just a matter of turning the flakes over, crunching them down, mixing with one hand while your rubber spatular turns and turns the flakes over.  After about 7 minutes or so you see that the flakes have broken down and are mostly covered in chocolate.  KEEP WORKING IT until the corn flakes are completely covered! 
  • Once covered... spoon small clumps onto a cookie sheet lined with parchment paper. 
  • Place in freezer for 1 or 2 minutes and remove
  • Sift powdered sugar over cookies and you are DONE! 
Picture


Cookies as they are spooned onto parchment paper before micro freezing
Picture
0 Comments

Detox Cereal!

11/21/2013

0 Comments

 
This a great Indian dish. A cornmeal morning potion that detoxifies and purifies.  This meal was originally described in the Charak as a way of reducing the wages of sin from the night before.  It increases agni.  Agni are the enzymes, or the "fire", that drive all digestion and metabolism in the Hindu medical practice of Ayurveda.   This is also a great recipe to reduce Kapha - if you feel stuffy, heavy-headed or congested, phlegmy or just stagnant... then this is the cereal to clear your head!  It is great with honey.. a must have when eating this as the sweetness balances the spices.  WONDERFUL CEREAL - My favorite - but exotically flavored.  So be ready for it!  Below is my picture of my breakfast this morning:)
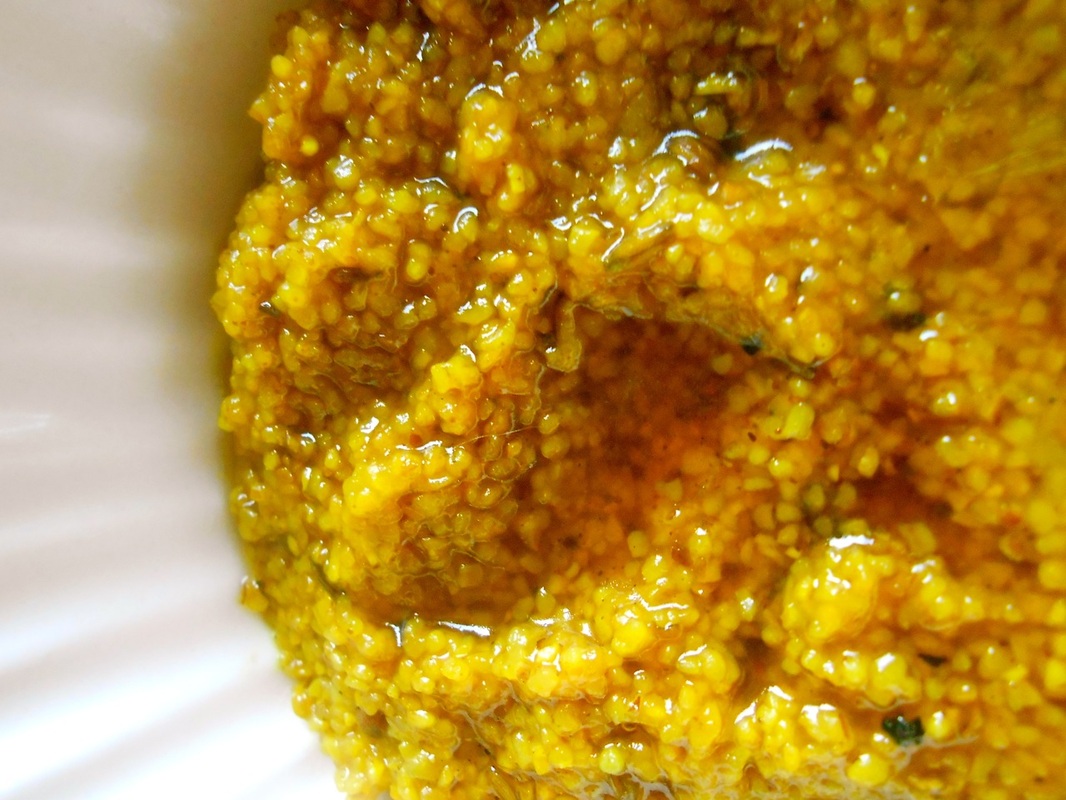
Picture
Ingredients
  • 2/3 cups dry cornmeal
  • 1/8 tsp Hing (this is an Indian spice similar to garlic - use garlic powder if needed)
  • 1/2 tsp whole cumin seeds (cumin can be strong - so be ready or use a bit less)
  • 1/4 tsp fresh ground black pepper
  • 1/4 tsp dry ginger powder
  • 1 tsp Turmeric
  • 1/2 tsp sea salt
  • 1 tsp coriander powder
  • 2 cups hot water
  • 2 tsp Sunflower oil (or similar)
  • 2 tsp ghee (this is clarified butter - if you don't have this use 2 tsp additional sunflower oil)
  • 2 tsp honey 


Directions


  • Heat large heavy skillet on low heat for 1 to 2 minutes.  Put in cornmeal and dry roast it for 5 minutes, stirring occsionally.  
  • As you roast it, add all the spices except for the coriander. 
  • Add the oil and ghee, stirring well.  It may not seem like enough at first (when you add the oil & ghee but once you mix it all in it is enough).  
  • Add the coriander, mixing well. 
  • VERY SLOWLY - and be sure to use a long-handled utensil for stirring) add the hot water!  Be care and add it slowly - it can steam up at you. 
  • Stir the cornmeal constantly as you add the water to avoid lumping.  Continue stirring until the cornmeal has a mushy consistency.  
  • Scoop into bowls and top with honey. 


THAT'S IT!
Picture
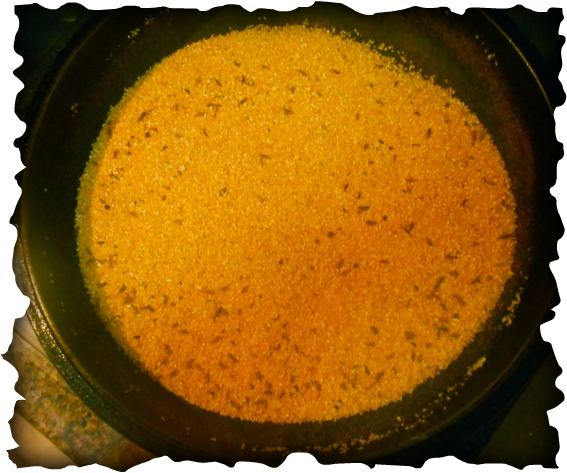
dry roasting the cornmeal with spices
0 Comments

Dhal-Oh-Mamma!  The Guru of Soups! 

11/17/2013

0 Comments

 
 “Happiness is not something that comes ready made. It comes from your own actions.” - Dalai Lama
Want a soup that is hearty, healthy, flavorful, good for you and only takes about 20 minutes to make?  This is my own take on Tarka Dhal - a red and yellow lentil curry-like soup.  However, I cheat and only use red lentils because they cook up in a pinch.  You will look like a Kitchen Guru Rockstar when you make this soup on the fly for guests or your loved ones.  It is, by far, one of the most deliciously satisfying soups around.  Try it... 

Picture
Serves 4 cups (I suggest doubling the recipe for extra or for larger servings)

  • 3/4 cups split red lentils (masoor dhal)
  • 2.5 cups Water
  • 1 heaping tsp. of grated ginger root
  • 1 heaping tsp of grated garlic
  • 1/4 tsp tumeric
  • 2 chopped green chiles
  • 1.5 tsp. Salt
  • Handful of finely chopped cilantro


Thoroughly rinse red lentils in your boiling pot in sink.  I run water on them and swish the lentils around with my hand and drain repeatedly until the water is then clear (Water saving tip: reuse the rinse water for your plants!). Then add your 2.5 cups water to the lentils and set on stove.  Add your grated ginger, garlic, turmeric, chilles and salt and bring it all to a boil then reduce to a simmer.  Simmer 15-20 minutes.  You can leave the lid off the pot or straddle it over the pot - I never cover completely and usually keep the lid off. 

Once lentils are soft, mash them in the pot with a potato masher or something similar... the consistency should be similar to a creamy chicken soup.  

That's it!!!  Always taste for adjustments - and add cilantro and serve OR - go all the way and make the Tarka topping below... 

Optional topping: 

In traditional Tarka Dhal - the Tarka part is topping made separately for the soup.  I love it but if you don't have time don't worry about it... that's the great thing about this soup - you can jazz it out or keep it simple

  • 2 TBSP veg. oil
  • 1 Onion, thinly sliced
  • 1/4 mixed mustard and onion seeds (if you don't have onion seeds use black sesame seeds)
  • 4 dried red chiles or 1/2 tsp red pepper flakes (I use Aleppo or other smoked chili pepper flakes)
  • 1 Tomato sliced


Heat oil and fry the onion with the mustart and onion seeds, dried red chillies and sliced tomato for 2 minutes or until soft.  Top onto your servings of Dhal Soup along with cilantro.  


0 Comments
<<Previous

    ABOUT THIS BLOG!

    I am simply a person with a serious passion for FOOD! I am not a chef, chemist or doctor - I am just a foodie food-head!  The recipes in this blog are things I make for myself, my family and my friends and they have been tested and tried by some of my closest food critics.  This blog has helped me become more aware and appreciative of the food I prepare and share and I am very grateful for this. 

    As for this blog - I have one piece of advice: Food is like our DNA - it is unique and specific to each of us! Add your own flare, energy and pulse and personality to your food.  It is a part of you!  It is who you are.  So, if something doesn't work for you in my recipes then be sure to be fearless and try your own flare... and  share your inspiration with us!  

    Archives

    June 2014
    February 2014
    January 2014
    December 2013
    November 2013
    September 2013
    June 2013
    May 2013
    April 2013

    Categories

    All
    Anytime Meals
    Beans
    Breads And Baking
    Breakfast Meal
    Dessert
    Diner Food
    Granola
    Holiday Treats!
    Hot Pot Recipes
    International Dishes
    Japanese Cuisine
    Meat Balls Vegan Style
    Nuts & Seeds
    Polenta
    Potato Salad
    Protein Cereal
    Sauces/dressing
    Sauteed Veggies
    Seaweeds
    Side Dishes
    Thai Food
    Tofu

    RSS Feed

www.unbeatenpathtours.com  CALL 707 888 6121 
  • Home
  • Guided Experiences
    • ALL TOURS & GENERAL INFO
    • THE SEA RANCH ARCHITECTURE & NATURE
    • REDWOODS TO COAST
    • SIGILS WALKSHOP
    • HIKE, WRITE & DESIGN
    • Breath-Body-Mind
    • STORNETTA LANDS NAT'L MONUMENT
    • SEASCAPES AND WILDFLOWERS
    • ELOPEMENTS
    • BREATH WALK & FOREST BATHING
    • YOGA & CORPORATE RETREATS
    • LARGE GROUP OPTIONS
  • THE SEA RANCH
    • THE SEA RANCH
  • Resilience WALKshops
    • ABOUT OUR WALKSHOPS
    • SIGILS WALKSHOP
    • HIKE, WRITE & DESIGN
    • Breath-Body-Mind
  • RETREAT WORK
  • YOGA
    • ABOUT YOUR TEACHER & GENERAL INFO
    • PRIVATE YOGA SESSIONS
    • SOUND BATHING
    • YOGA STREAMS
    • YOGANATUR - HIKE & YOGA
  • BOOK ONLINE
  • CONTACT+
    • OUR BIO
    • WRITE A REVIEW
    • UNBEATEN PRESS
    • CONTACT US
    • FAQ
    • BLOG
  • Waiver & Policies
  • Buy our Beanie!