UNBEATEN PATH TOURS & YOGA 707 888 6121
  • Home
  • Guided Experiences
    • ALL TOURS & GENERAL INFO
    • THE SEA RANCH ARCHITECTURE & NATURE
    • REDWOODS TO COAST
    • SIGILS WALKSHOP
    • HIKE, WRITE & DESIGN
    • Breath-Body-Mind
    • STORNETTA LANDS NAT'L MONUMENT
    • SEASCAPES AND WILDFLOWERS
    • ELOPEMENTS
    • BREATH WALK & FOREST BATHING
    • YOGA & CORPORATE RETREATS
    • LARGE GROUP OPTIONS
  • THE SEA RANCH
    • THE SEA RANCH
  • Resilience WALKshops
    • ABOUT OUR WALKSHOPS
    • SIGILS WALKSHOP
    • HIKE, WRITE & DESIGN
    • Breath-Body-Mind
  • RETREAT WORK
  • YOGA
    • ABOUT YOUR TEACHER & GENERAL INFO
    • PRIVATE YOGA SESSIONS
    • SOUND BATHING
    • YOGA STREAMS
    • YOGANATUR - HIKE & YOGA
  • BOOK ONLINE
  • CONTACT+
    • OUR BIO
    • WRITE A REVIEW
    • UNBEATEN PRESS
    • CONTACT US
    • FAQ
    • BLOG
  • Waiver & Policies
  • Buy our Beanie!

Food 4OREthought:)

Dear Food: 

Will you marry me?  I LOVE YOU!  This blog is dedicated just to you. I celebrate you by sharing my "made from scratch" recipes.
Nutrition Facts. org

Madge's Minty Mountains! A tasty, minty, crunchy Holiday cookie!

12/17/2013

0 Comments

 
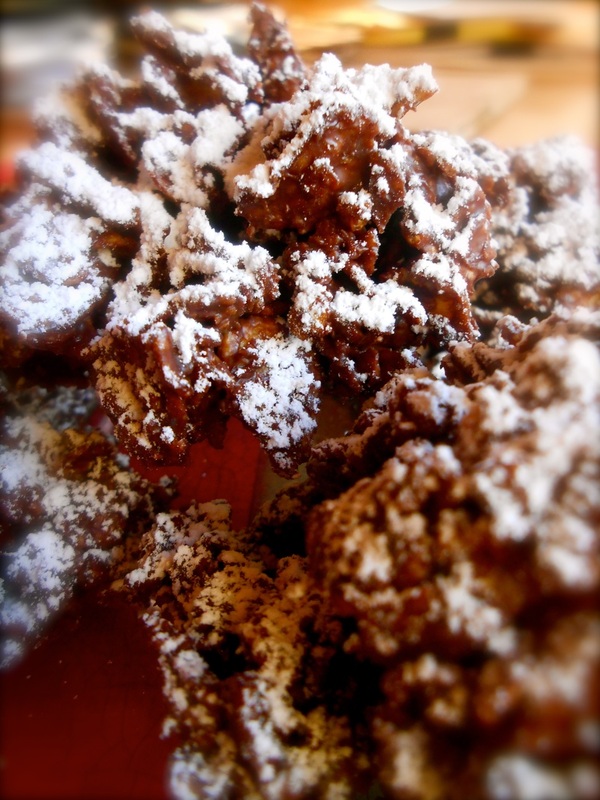
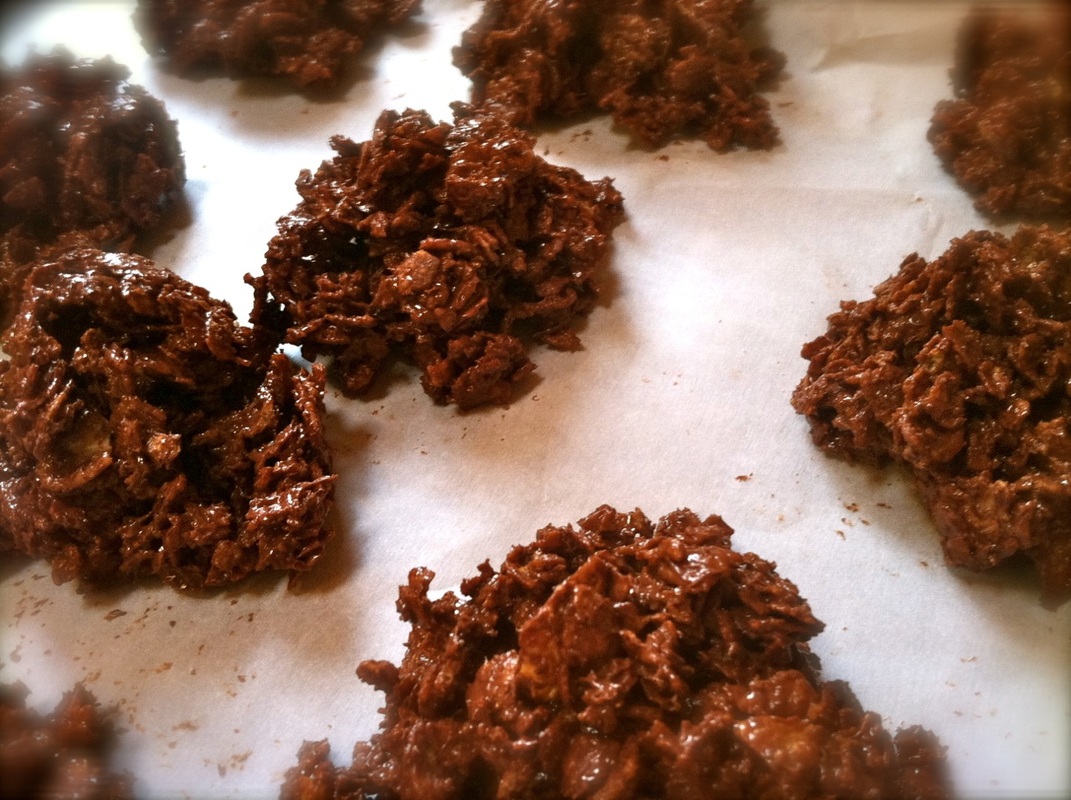
This is a GREAT holiday treat recipe that's sooooo easy to make, sooooo tasty and makes a TERRIFIC HOLIDAY GIFT! People always rave about them when I make them.  I call them (my) Madge's Minty Mountains and they require a mere 4FOUR! ingredients.  Corn Flakes, semi-sweet or dark chocolate chips, peppermint extract and powdered sugar.  I use gluten free millet or corn flakes from the health food store... they have a much better crunch and they are much better for you. They take less than 20 minutes to make!!  
See how below!
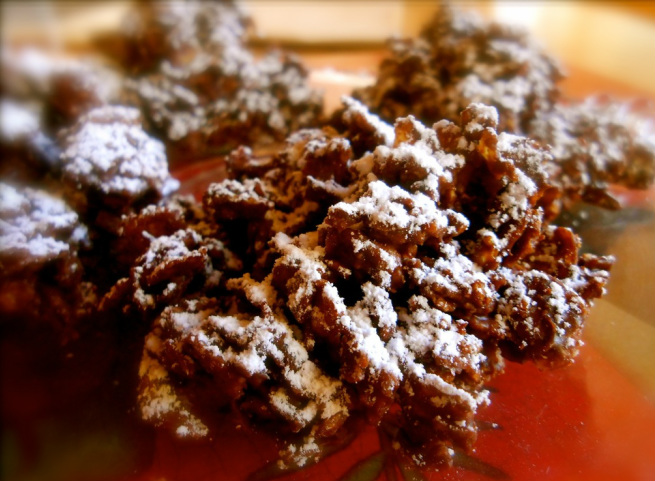
Picture
INGREDIENTS: 

  • Approximately 1/2 of a medium box of Corn Flakes - I buy gluten free millet flakes or gluten free corn flakes at the health food store.  They are much crunchier & tastier. Eye measurement: In a large 10" bowl it would be about 1/2 full of corn flakes.
  • 1 standard size bag of semi-sweet or dark chocolate chips
  • 1/2 tsp peppermint extract (one large cap full) 
  • 1 scoop of powdered sugar in a hand held strainer (like a tea pour strainer)  


DIRECTIONS:  

HINT: Chocolate is very fickle and doesn't like being over heated or combined with water.  Chocolate is an oil, really - and when you add your extract it is like adding water to oil.  Therefore, you must add the extract only when the chocolate is melted and warm and you must whisk your extract in as quickly as possible - or your chocolate will seize and will become rock hard and unfixable... just chuck it away if that happens:(( Bummer

  • VERY carefully and slowly heat your chips in a glass bowl over a simmering pot of water.  Stirring often.  Once melted remove your bowl and - with your measured extract at the ready - pour this quickly into the chocolate as your stir consistently with a fork or whisk.  Have someone hold the bowl for you or hold it yourself once you have poured the extract in.  This helps with balance when stirring it all together.  
  • Taste chocolate for minty-ness.  If you need to add more... warm your chocolate over the water again for just a short moment (so the choc gets soft) and then add your additional extract. 
  • In a large bowl pour in your corn flakes.  It may seem like too much but they will break down and your chocolate will cover them.  
  • Pour melted, minty chocolate over corn flakes and work quickly to combine.  This takes arm work and you MUST WORK QUICKLY.  It is hard to get the chocolate to cover the flakes thoroughly - it is just a matter of turning the flakes over, crunching them down, mixing with one hand while your rubber spatular turns and turns the flakes over.  After about 7 minutes or so you see that the flakes have broken down and are mostly covered in chocolate.  KEEP WORKING IT until the corn flakes are completely covered! 
  • Once covered... spoon small clumps onto a cookie sheet lined with parchment paper. 
  • Place in freezer for 1 or 2 minutes and remove
  • Sift powdered sugar over cookies and you are DONE! 
Picture


Cookies as they are spooned onto parchment paper before micro freezing
Picture
0 Comments

Fudge it Fudge Balls. 

6/25/2013

1 Comment

 
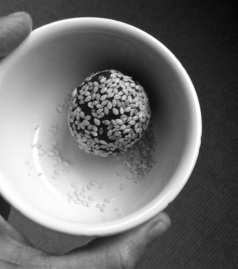
You've got guests coming for dinner. You want to have a dessert but don't have the time.  What to do?  Here's my answer and it's healthy and pretty to look at, to boot! Wow! 

Where we live (there are no traffic lights here, if you can imagine). So we don't have many choices for stores or shops - many times it is necessary to rely on our own devices to "cook" something up in a jiffy. This is what I did to solve my dessert dilemma.  And the best part is that our guests wanted to take some home with them.  That's always a nice thing to hear. 

What is it, exactly? Basically, it's a chocolate fudge ball made from ground nuts, leftover granola, remains of some cocoa powder, a melted cube of bittersweet chocolate, some tahini, spices & a spoonfull of orange marmalade for moistness - ALL balled up and rolled in sesame seeds.  YUM!  See how below!
Picture
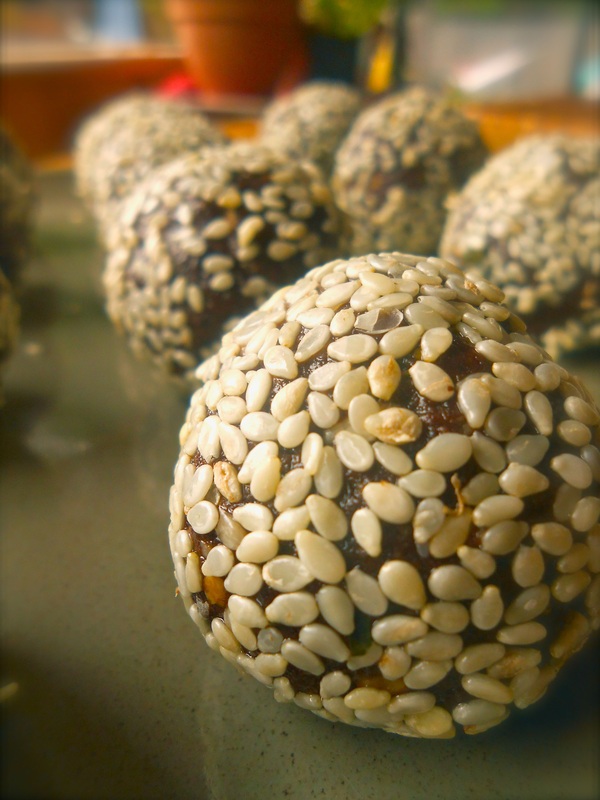
So HERE's HOW TO WING IT!  

THIS "RECIPE" made 12  small Fudge Balls (about 1" in size)
I used several different kinds of nuts that I had on hand.  About 1/2 cup each of 3 types (or use what you have) but it should total about 1.5 cups of nuts.  In my case I used: 

INGREDIENTS
  • 1/2 cup almonds (all seeds can be raw or toasted - but try not to use salted seeds, if possible)
  • 1/2 cup sun flower seeds
  • 1/2 cup homemade granola I had leftover
  • 1 or 2 1oz cubes of Bittersweet chocolate melted in microwave until soft and stirred with forth until smooth. *Note: if you don't have this on hand - use something that is chocolatey.  I had a piece of leftover torte in the fridge, I could have use this.  OR - you could use Cocoa Powder (pure powder). 
  • 1-2 TBSP of cocoa powder (this amount depends on consistency when all ingredients are pureed)
  • 1/4 cup Tahini (don't have tahini - try using almond butter - it will change the flavor but go for it, try it!)
  • 2 TBSP or so of Agave (if you don't have it - double up on Marmalade or a berry jam)
  • 1 medium spoonful of Orange Marmalade 
  • 1/4 tsp of nutmeg
  • 1/4 tsp hot chile powder
  • 1/4 tsp Allspice 
  • 1/4 tsp kosher salt (or more to taste ... not tooooo much, though)*Note: I didn't have cinnamon on hand - but I definitely would use this as well - goes great with chile powder!
  • 1 tsp Water (at a time) if mixture is too dry at the end of the process to mold into balls - add one and mix, then check ... DO NOT ADD WATER unless you need it. 
  • Sesame Seeds to coat fudge balls (see how in picture below)

INSTRUCTONS

  • Puree the seeds/nuts/granola until it becomes a fine meal
  • With the blades spinning, slowly pour in the tahini and agave
  • Add melted chocolate, cocoa and remaining ingredients except the water - see how the mixture looks (I wait until the end, taste the mixture and if it needs more chocolate, salt or spice that is when a I add more - REMEMBER - this is YOUR DISH when you serve it to people - taste it and make it to your standards)
  • Check consistency - if it is too mealy or dry then add a bit of water (or a bit more marmalade) and mix with your hands until it can form a ball - it DOESN'T TAKE MUCH for it to form so do not over water - if you do, add more cocoa and slow down:)
  • Let mixture sit at room temp for 15 minutes then form into 1" balls with your hands 
  • To coat: Pour sesame seeds into small bowl, place your fudge ball inside the bowl and swoosh the bowl in small circles so that the ball inside rolls around and coasts itself in the seeds:)  SO EASY 

Picture
<---------- that's how you swoosh:)

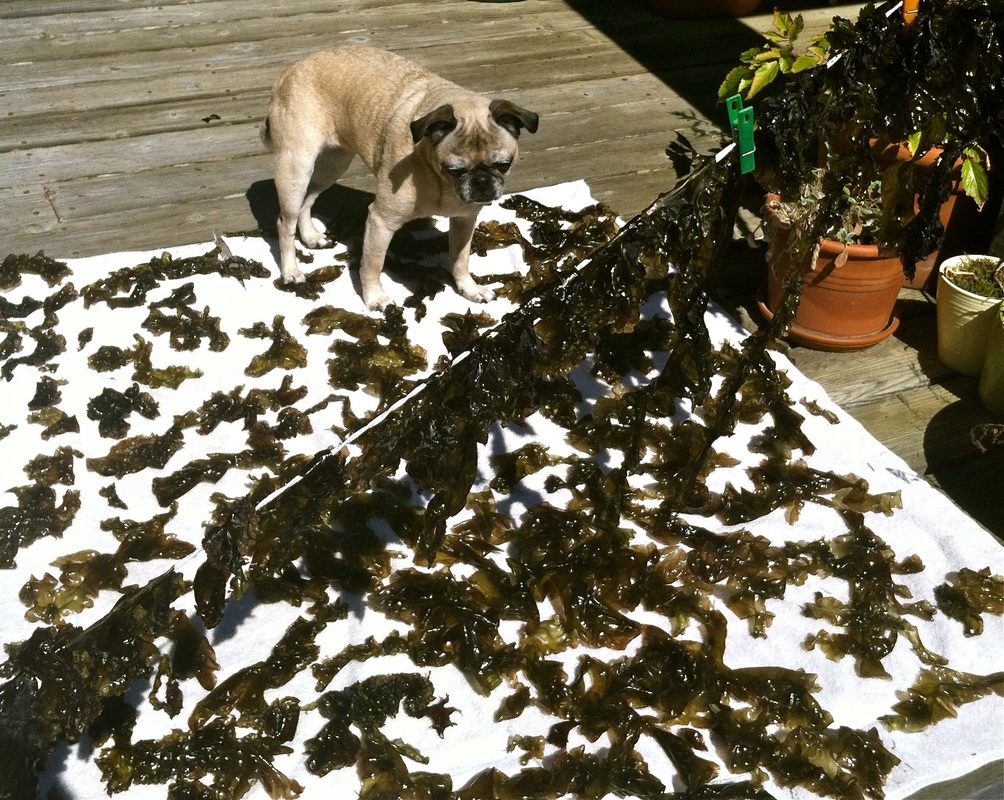
When your fudge balls are all done and coated plate them and store in refridge.  They will harden - so, I remove them about 1 hour before dessert to let them soften a bit.  If they are too big cut the fudge balls in half with a sharp knife - you don't want to loose their shape - so don't squish - and plate stylishly atop one another. 

These Fudge Balls pack a tasty punch - so it is good to serve them with an after dinner drink that will balance their richness.  I serve them with coffee spiced with ground cardamom or with cinnamon (I love cardamom - but it is not for everyone).  HMMMMM GOOD!

1 Comment

Glory B to Nori!!! 

6/9/2013

0 Comments

 
Picture
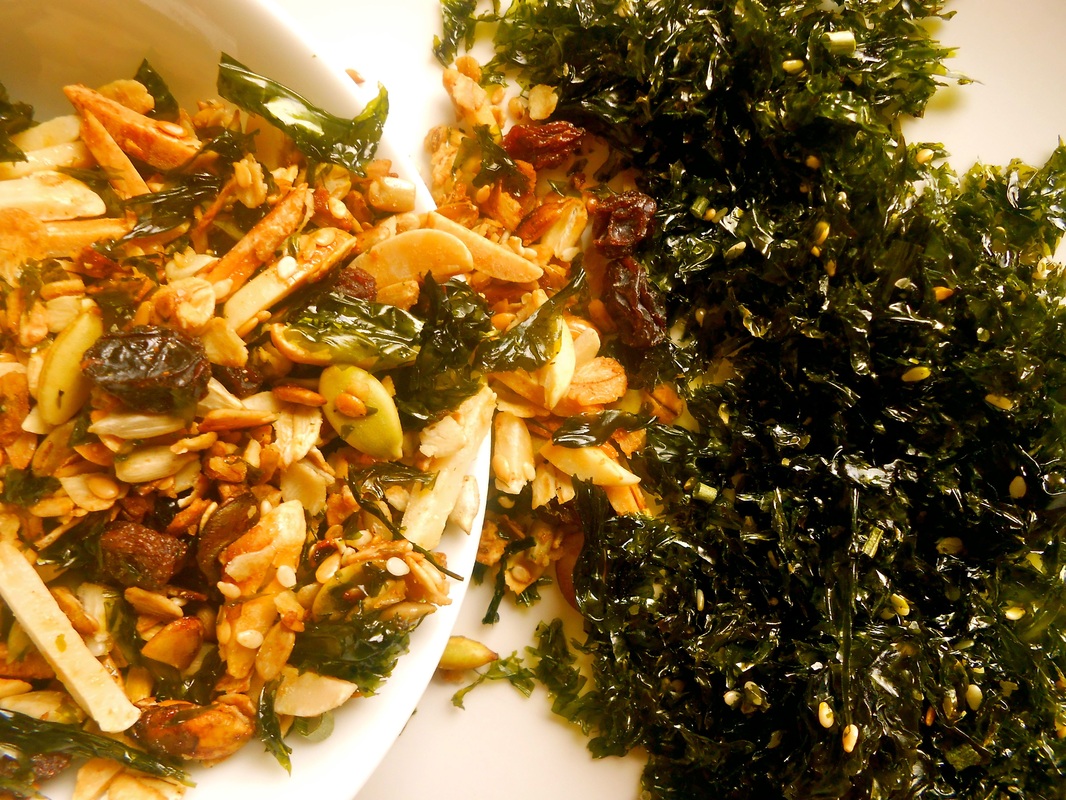
I make just plain granola and mix my dried Nori with it... so scrumptious!
Ahhhh ....Nori Seaweed.  Many of you know Nori as the green seaweed wrap used in Sushi cuisine.  Here on the Mendonoma coast Nori grows abundantly wild along with many other edible sea vegetables.  One doesn't need to harvest much to produce a lot of dried/finished product!  A small zip lock bag full of Nori for my personal consumption is enough to last a very long time - and for this I am forever grateful to nature!  What a treasure it is.  I harvest it, dry it in the sun and then roast it with sesame seeds and a bit of sesame oil - once done I flake it down and put it into jars and use it as a roasted snack, in homemade granola or sprinkle it virtually on any foods I eat... I even put it into my breakfast cereal!  It is THAT GOOD! and incredibly nutritious. And for those concerned about a "fishy" or brine-like flavor ... FEAR NOT!  Roasted Nori has a salty, nutty flavor and it is tastier with a sesame flare. 

Nori (Porphyra porforata) is a rich source of vitamin C and contains up to 25% protein by weight. Nori also adds vitamin B12, carbohydrates and trace minerals to your diet. It is the seaweed highest in protein, iron and vitamin B-12. In fact, there is no land vegetable that packs the same kind of nutritional & mineral rich punch as NORI or any fresh Sea Vegetable for that matter.  Not one!

Here on the Mendo Coast one may harvest no more than 5 lbs a day for personal use.  And, believe me, 5lbs is WAY TOO MUCH.  I pull about an 1oz of the stuff and it lasts forever! I harvest responsibly - so, if you choose to harvest be sure to talk with someone that does harvest and do so responsibly.  It makes you appreciate it more when you do the proper homework and research to collect this precious gift. 

Madge's Homemade (vegan) Nori Granola Bars!

Picture
Picture
My roasted sesame seed Nori - a deep emerald green color after roasting.
Picture
My pug Bubble is inspecting my drying process!
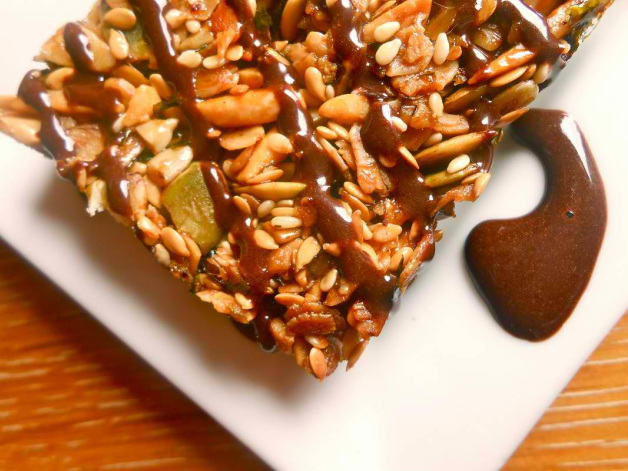
How to prepare Nori:  You can purchase Nori dried in its raw/harvested form.  Look up Mendocino Seaweed retailers.  Or if you have some that has been harvested and dried in the sun this is what you can do:  Grease your hands with sesame oil and massage the dried Nori, ensuring that you have coated it as best you can with a very thin layer of oil from your hands.  Sprinkle with raw sesame seeds, spread on a cookie sheet and bake in a 300 degree F oven for about 5 minutes being sure to check on it every 2 minutes.  It should turn a rich emerald green as shown above in my photo.  I then jar this in an air tight glass container and store it in the pantry.  Actually , I always have it out and use it in everything. 


**IMPORTANT TO NOTE:  For those not familiar with eating this type of nutritional vegetable - it is important not to overdose on eating this.  It is rich in Iodine and Iron - so, it is important to take a break every two weeks or so.  Our american diets are not rich in seaweed normally (but they should be)... so, if you are pregnant or have iodine issues - please be sure to check in with your practitioner and do some reliable Internet RESEARCH. 

Vegan Granola Bars with a Cocoa/Vegan Chocolate Sauce... 
  • 1/4 cup Agave nectar or maple syrup (if you have sugar issues, the agave acts as a binder for this. I haven't tried a sugar substitute for this - but you would need something that will "bind" the food - Flax seed meal soaked in water until it is a paste might work as a binder - but I haven't tried this alternative either). 
  • 1/8 cup Grape seed oil
  • 1 cup raw, slivered organic almonds
I use an approximate HANDFUL of the following raw nuts/seeds: 
  • pumpkin seeds
  • golden flax seeds
  • sunflower seeds
  • walnuts
  • sesame seeds
  • Gluten Free Oats (I use Bob's Red Mill) - about 1 cup
  • 1/2 cup or more of freshly roasted Nori sesame flakes. 
  • 1/2 teaspoon hing (garlic substitute)
  • 1 tsp red aleppo pepper flakes or any kind of spicy pepper flake
  • 1/2 teaspoon sea salt

INSTRUCTIONS
Preheat oven to about 325 degrees F. 
  • Combine oil and agave nectar in a small saucepan on stove and bring to a rolling simmer being sure to constantly keep stirring and moving the liquid in the pan.  Simmer for a couple of minutes until it thickens but don't simmer too long or it will turn into candy.  Be sure not to let it get too brown or burn either.  Just so it thickens. 
  • Remove from stove and add in all ingredients and combine thoroughly.  The ingredients will be covered and sticky but the granola itself will be kind of loose (not in a big huge clump)
  • Spray an 8" x 8" glass brownie pan with vegetable spray and then spread granola mix into pan being sure to press it down firmly so that it is fixed and flat.  It will seem a bit loose but will definitely be flat and sticky. 
  • Bake for about 25 minutes being sure to check on it after 15 minutes and then every 5 minutes after that until the granola is browned and the edges are browned.  Do not let burn (yuck!).  
  • Remove from oven and allow to cool thoroughly.  When you first remove it - it will seem like it is not sticking together or is even crunchy ... but don't worry!  After it cools thoroughly it will be crunchy and you will be able to cut pieces with a sharp knife
  • Cut into squares for a nice snack or top with my Vegan Chocolate sauce for a healthy dessert.  See chocolate sauce receipt below. 


VEGAN CHOCOLATE SAUCE:  1 TBSP Dark Cacao powder mixed with 2 TBSP of agave nectar ... mix slowly until well blended (it is a bit of a bear to mix initially but it slowly begins to come together.  Check consistency and add more agave nectar to thin this sauce out.  That is it. 


0 Comments

    ABOUT THIS BLOG!

    I am simply a person with a serious passion for FOOD! I am not a chef, chemist or doctor - I am just a foodie food-head!  The recipes in this blog are things I make for myself, my family and my friends and they have been tested and tried by some of my closest food critics.  This blog has helped me become more aware and appreciative of the food I prepare and share and I am very grateful for this. 

    As for this blog - I have one piece of advice: Food is like our DNA - it is unique and specific to each of us! Add your own flare, energy and pulse and personality to your food.  It is a part of you!  It is who you are.  So, if something doesn't work for you in my recipes then be sure to be fearless and try your own flare... and  share your inspiration with us!  

    Archives

    June 2014
    February 2014
    January 2014
    December 2013
    November 2013
    September 2013
    June 2013
    May 2013
    April 2013

    Categories

    All
    Anytime Meals
    Beans
    Breads And Baking
    Breakfast Meal
    Dessert
    Diner Food
    Granola
    Holiday Treats!
    Hot Pot Recipes
    International Dishes
    Japanese Cuisine
    Meat Balls Vegan Style
    Nuts & Seeds
    Polenta
    Potato Salad
    Protein Cereal
    Sauces/dressing
    Sauteed Veggies
    Seaweeds
    Side Dishes
    Thai Food
    Tofu

    RSS Feed

www.unbeatenpathtours.com  CALL 707 888 6121 
  • Home
  • Guided Experiences
    • ALL TOURS & GENERAL INFO
    • THE SEA RANCH ARCHITECTURE & NATURE
    • REDWOODS TO COAST
    • SIGILS WALKSHOP
    • HIKE, WRITE & DESIGN
    • Breath-Body-Mind
    • STORNETTA LANDS NAT'L MONUMENT
    • SEASCAPES AND WILDFLOWERS
    • ELOPEMENTS
    • BREATH WALK & FOREST BATHING
    • YOGA & CORPORATE RETREATS
    • LARGE GROUP OPTIONS
  • THE SEA RANCH
    • THE SEA RANCH
  • Resilience WALKshops
    • ABOUT OUR WALKSHOPS
    • SIGILS WALKSHOP
    • HIKE, WRITE & DESIGN
    • Breath-Body-Mind
  • RETREAT WORK
  • YOGA
    • ABOUT YOUR TEACHER & GENERAL INFO
    • PRIVATE YOGA SESSIONS
    • SOUND BATHING
    • YOGA STREAMS
    • YOGANATUR - HIKE & YOGA
  • BOOK ONLINE
  • CONTACT+
    • OUR BIO
    • WRITE A REVIEW
    • UNBEATEN PRESS
    • CONTACT US
    • FAQ
    • BLOG
  • Waiver & Policies
  • Buy our Beanie!